Your first hour
From opening the app to an assistant that is awake, one small step at a time, with what you should see at each one.
You will be able to open the app, build a server in your own hosting account, and wake an assistant that answers you.
This walks the whole way in, from nothing at all to an assistant that answers you. Nothing here assumes you are technical. Every step says what to do, what you should see afterwards, and what to do if you see something else.
The setup itself takes about fifteen minutes, most of it watching a progress bar while your server builds. The interview at the end is the better part of an hour on top, and it is a conversation, not a form. You can stop after any step and come back; nothing here is lost by walking away.
You need four things: the Crads AI app, the Claude desktop app signed in to a paid Claude account (Pro is the minimum; the free tier will not run an assistant), a free GitHub account for your brain's private backup, and an account at one of the two hosting companies the wizard supports, with an API token for it (skip this one if you choose On this computer, below). Hetzner is the cheaper; DigitalOcean has a Sydney location. The wizard explains the token as you go, and get a Hetzner API token or get a DigitalOcean API token is the same walkthrough as its own page if you would rather do it first.
Worth knowing before you start: the machine you are about to create is yours in the plainest sense. It is built in your own hosting account, billed to you by that company, and the only key on it from its first boot is this computer's. Nothing about it is stored with Crads-AI, because there is nothing central to store it in.
Step 1. Open the app#
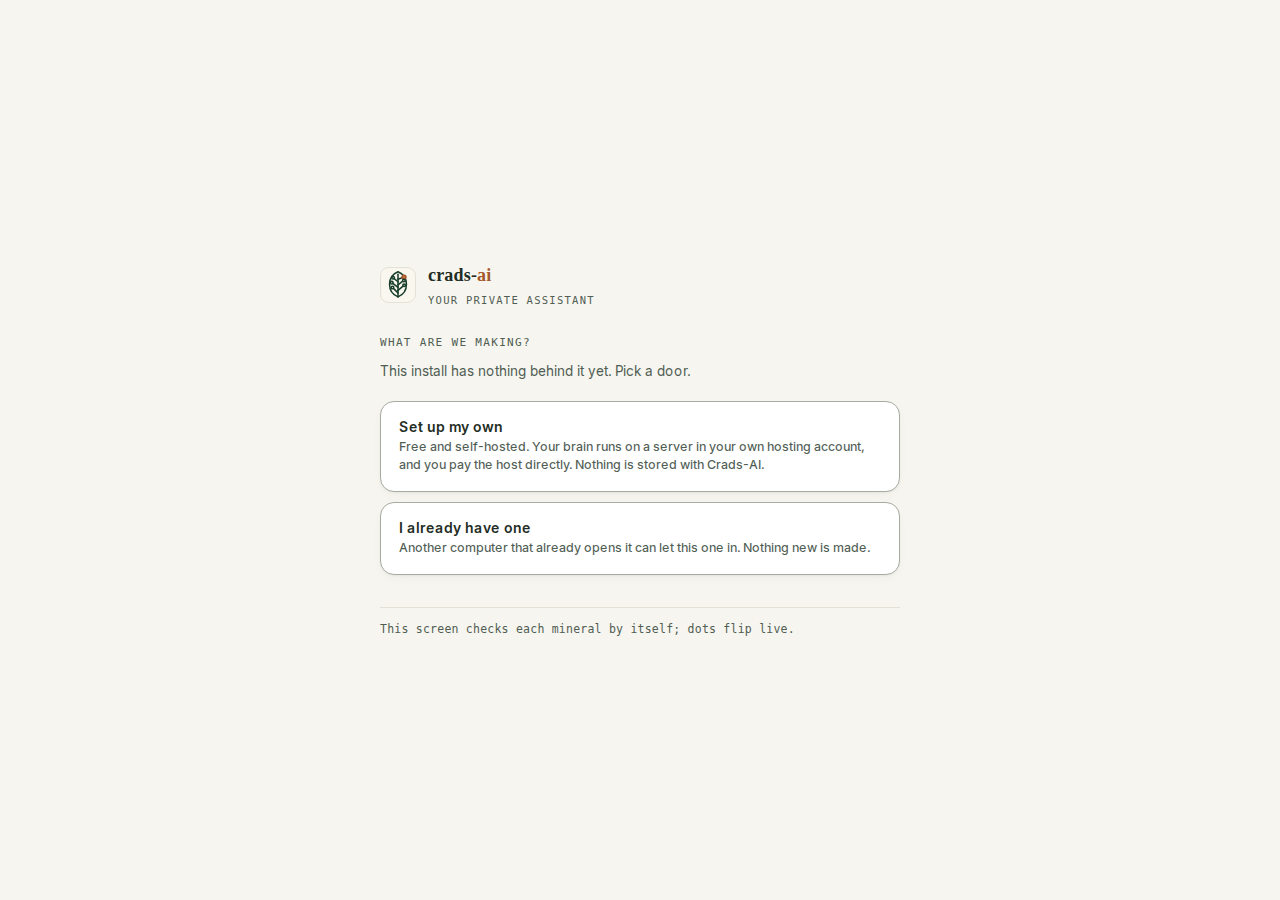
The first screen is called the door. It asks what we are making.
You should see: two large choices. Set up my own builds a new mineral, and it is the one you want. I already have one is for a second computer joining a mineral that already exists; that path is its own page.
On this computer is the third choice on current builds. It skips the server entirely and opens the assistant against a folder on your own machine: free, but no scheduled jobs, no Telegram and no connections, because it is only awake when you are. This page is the server route; if you pick On this computer, the steps below about a host, a token and a build do not apply, and you go straight to the interview.
If instead you see a list of names, someone has used Crads AI on this computer before. The same Set up my own choice is below the list.
 12
12- Set up my own: builds a new mineral in your own hosting account. The one you want.
- I already have one: for a second computer joining a mineral that exists. Nothing new is made.
Step 2. The costs, before anything else#
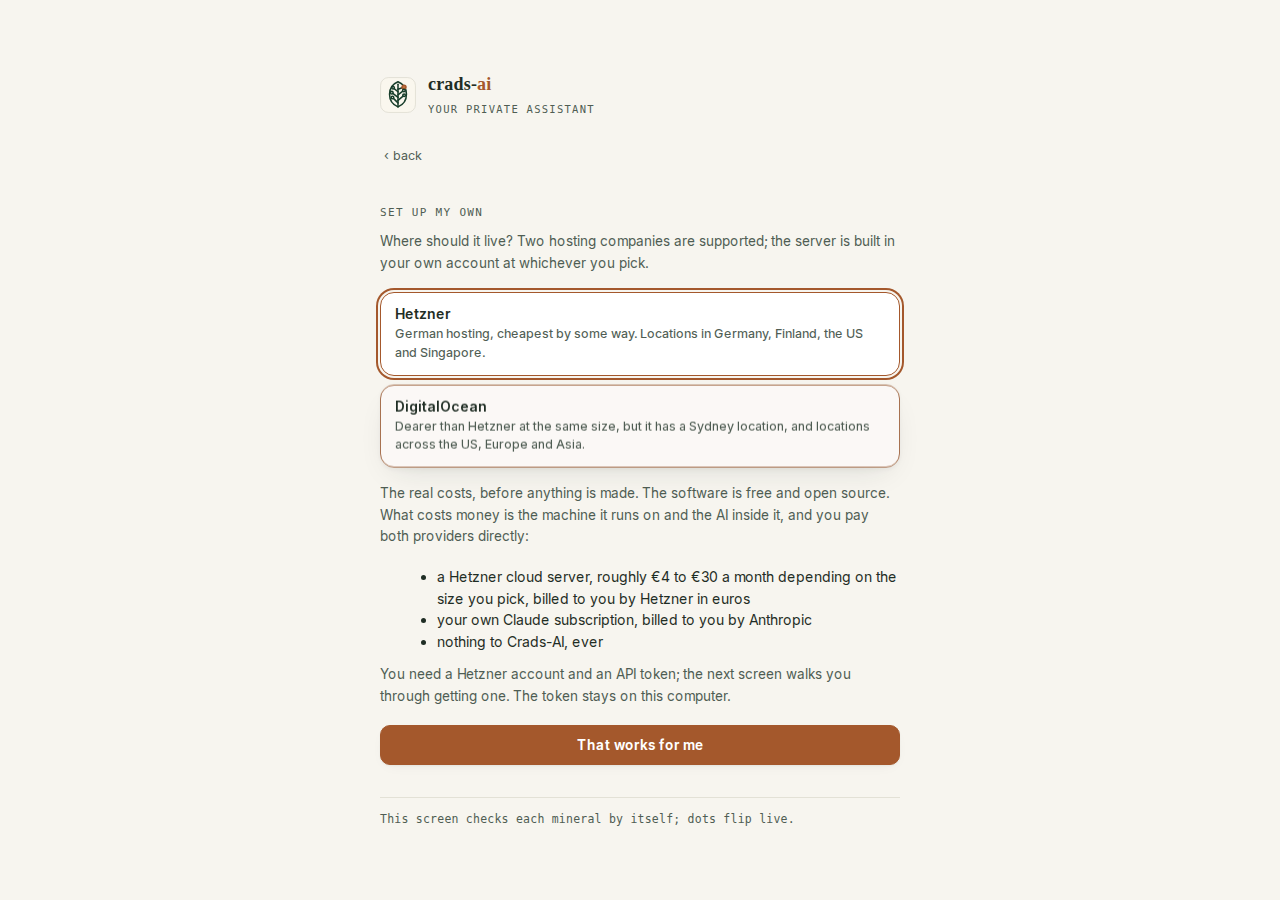
Press Set up my own. The first screen asks where it should live, then shows the bill, in full, before anything is created:
- a cloud server in your own account at the company you picked: at Hetzner roughly €4 to €30 a month, at DigitalOcean roughly $24 to $96, depending on the size you pick, billed to you by them
- your own Claude subscription, billed to you by Anthropic
- nothing to Crads-AI, ever
If that works for you, say so and carry on. There is no other screen where a cost appears later.
 123
123- Pick where it lives: Hetzner (cheapest) or DigitalOcean (has a Sydney location). The server is built in your own account there.
- The whole bill: the server, billed by the host you picked; your Claude subscription, billed by Anthropic; nothing to Crads-AI.
- Carry on. No cost appears on any later screen.
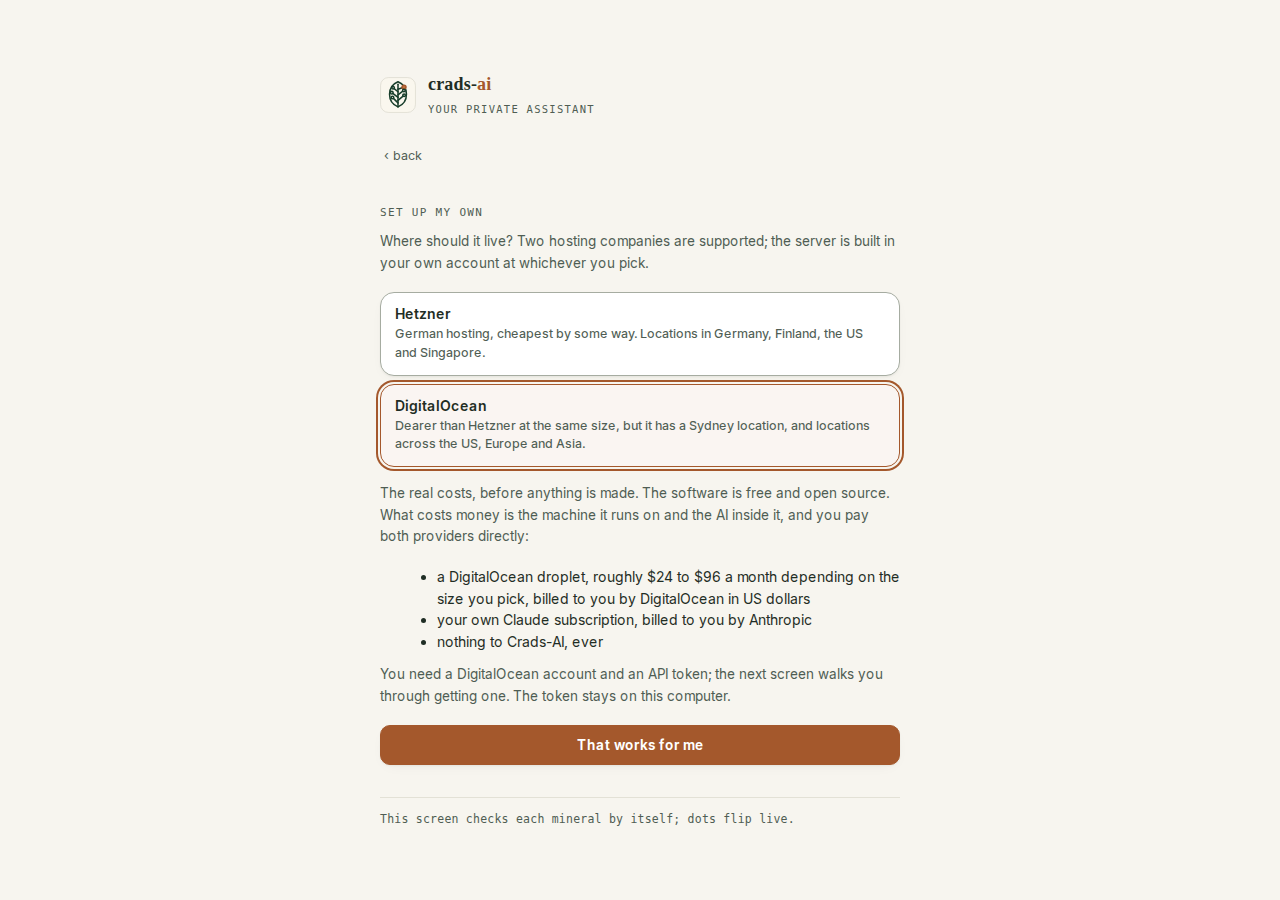
Pick Hetzner unless you have a reason not to; it is the cheaper of the two. Pick DigitalOcean if you want your server in Sydney, or in one of the other places it has that Hetzner does not. The cost line and everything on the next screen follow your pick.
 12
12- DigitalOcean picked. Dearer than Hetzner at the same size, but it has a Sydney location.
- The cost line follows the pick: US dollars here, euros on Hetzner.
Step 3. Name it, and paste your token#
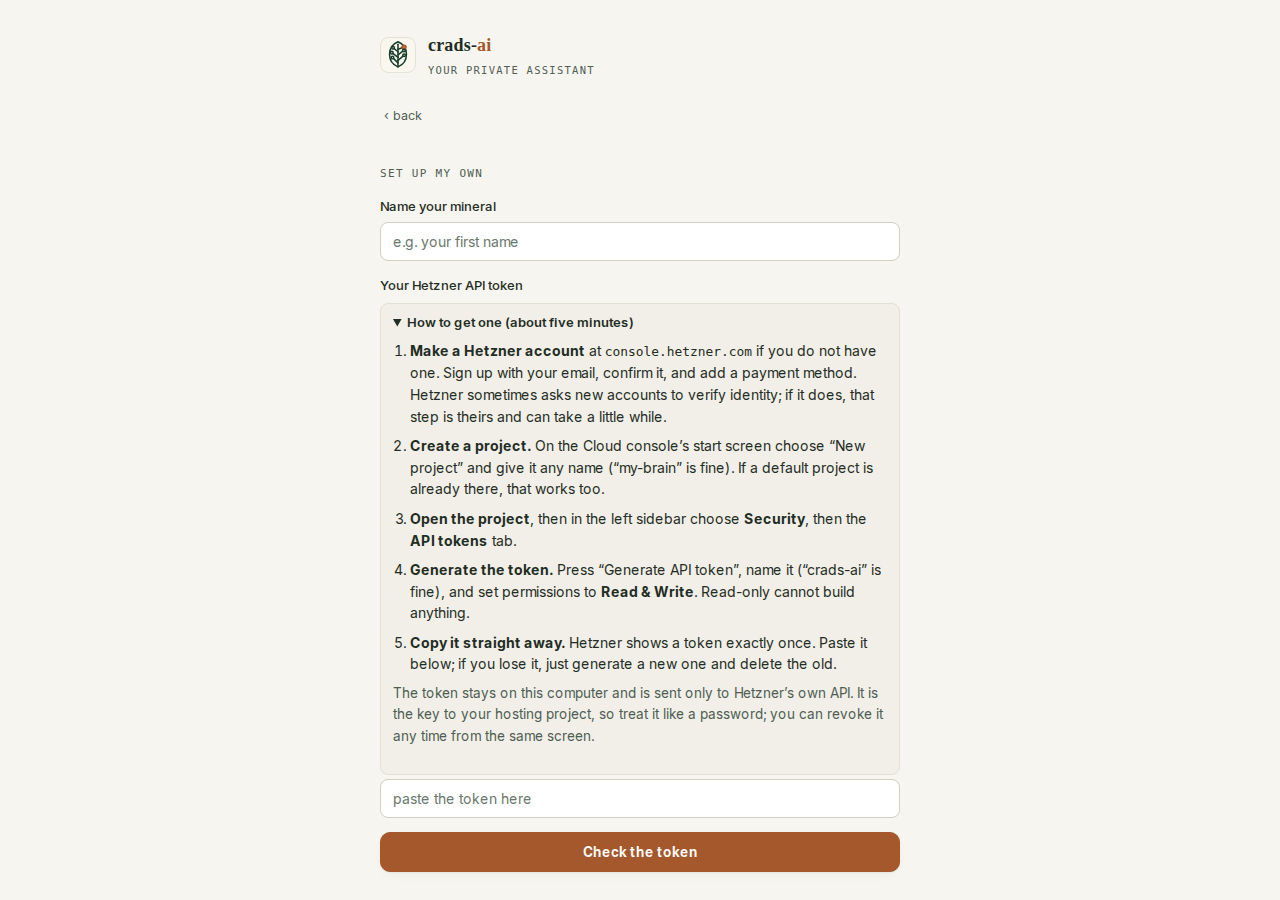
Two boxes. The name is what your mineral, and your assistant, will be called; your first name is a fine answer. The token is the API token for the hosting company you picked, and a fold on the same screen walks you through getting one in about five minutes if you have not yet.
The token deserves one honest sentence: it stays on this computer, is sent only to that company's own API, is never written to disk and never stored, and you can revoke it in their console at any time. Press Check the token and the app proves it works with a read-only call before offering to build anything.
 1234
1234- What your mineral, and your assistant, will be called.
- How to get a token, in about five minutes, without leaving this screen.
- The token goes to the host you picked and nowhere else, and is never stored.
- Proves the token works with a read-only call before offering to build anything.
Step 4. Pick a place and a size#
Where in the world lists the locations your hosting account actually offers, so pick whichever is closest to you or wherever you want your data to live.
How big a machine is three plain cards, each showing the real machine underneath and the host's real monthly price for it in your chosen location. The three mean the same thing at either company (4, 8 and 16 GB of memory):
- Small: about the cheapest that runs well. Fine for getting started.
- Standard (recommended): what we test on. Comfortable for one person's assistant, day in and day out.
- Roomy: headroom for heavy use and never having to think about it.
Pick one and press Build it.
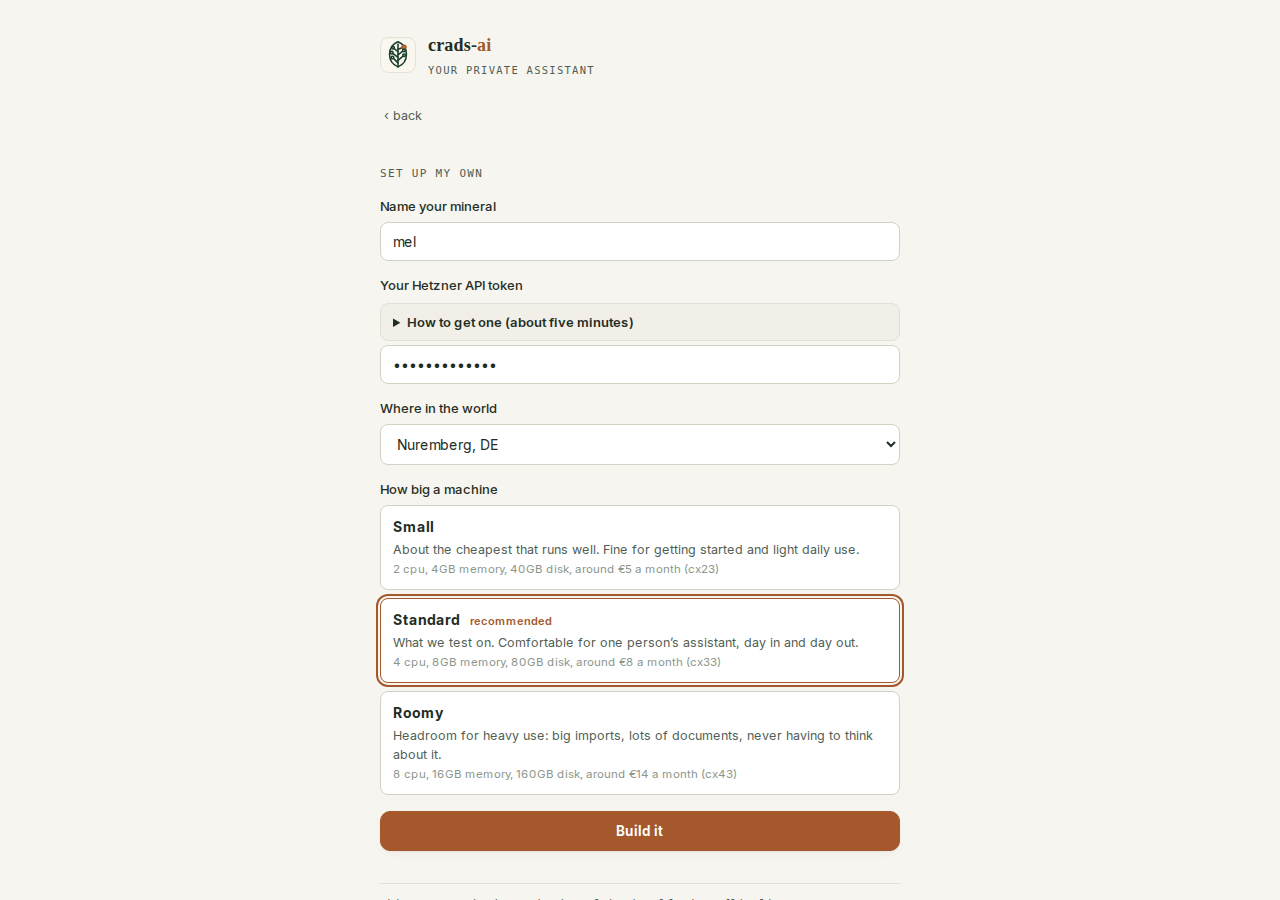 123
123- Only the locations your account can actually build in.
- Three plain sizes. The fine print names the real machine and its monthly price where you chose.
- Build it. From here the wizard creates the server on your own account.
The prices in the picture are indicative: Hetzner's list prices on the day the screenshot was taken, in euros. The wizard reads the live price list each time you run it, so the numbers on your screen are the ones you will pay.
Step 5. Watch it build#
The wizard creates the server on your account and shows each step as it happens. The server boots and then downloads its workspace, which takes a few minutes; the screen notices by itself. If you close the app partway, opening it again picks the build back up, and if a build fails you get a Remove the half-made server button that uses your own token, so nothing half-made ever sits on your bill unnoticed.
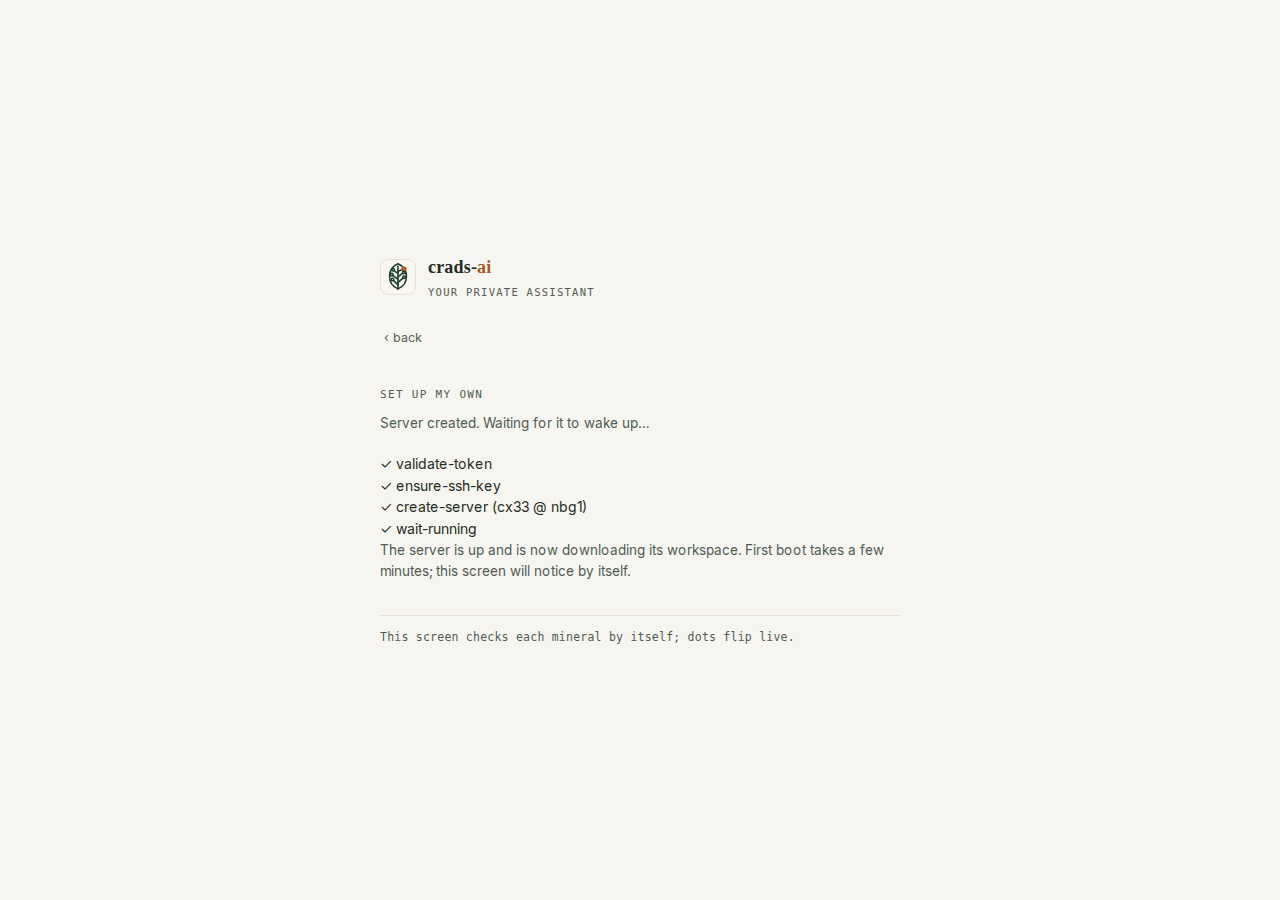 12
12- Each step as it happens. Closing the app partway loses nothing: reopening picks the build back up.
- First boot downloads the workspace. Minutes, not seconds, and the screen notices by itself.
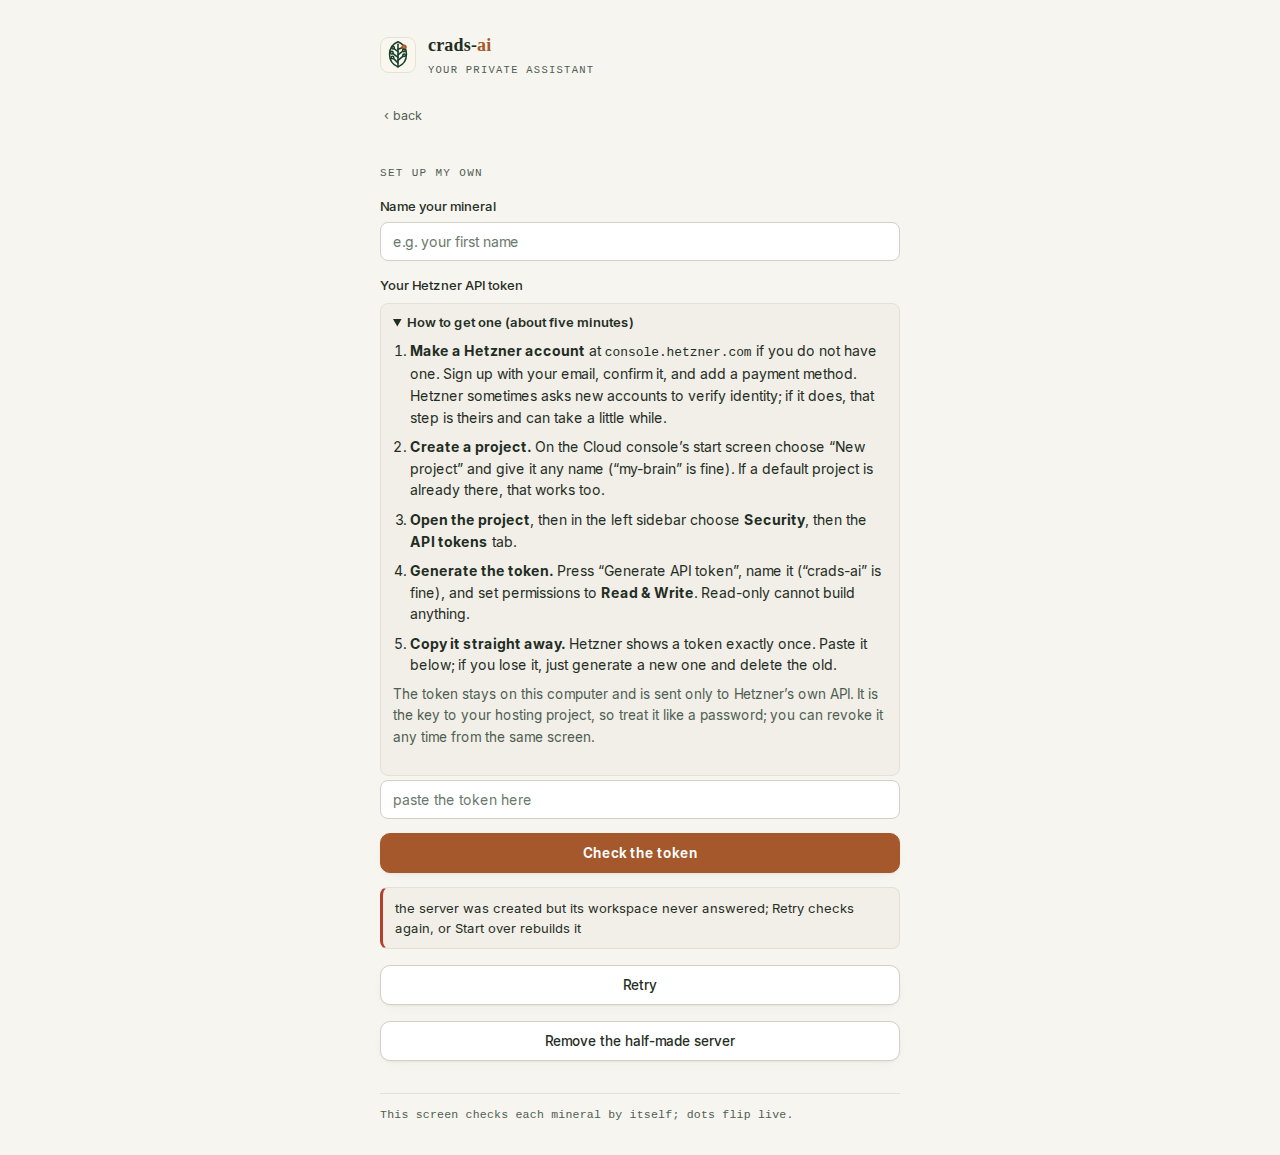 12
12- What went wrong, in one line.
- Remove the half-made server, so nothing sits on your bill unnoticed.
You should see, at the end: "Your mineral is alive", at the top of a short finish checklist. Alive is not the same as finished: the same screen carries the two steps that make the mineral fully yours, each with an honest done or not-yet chip.
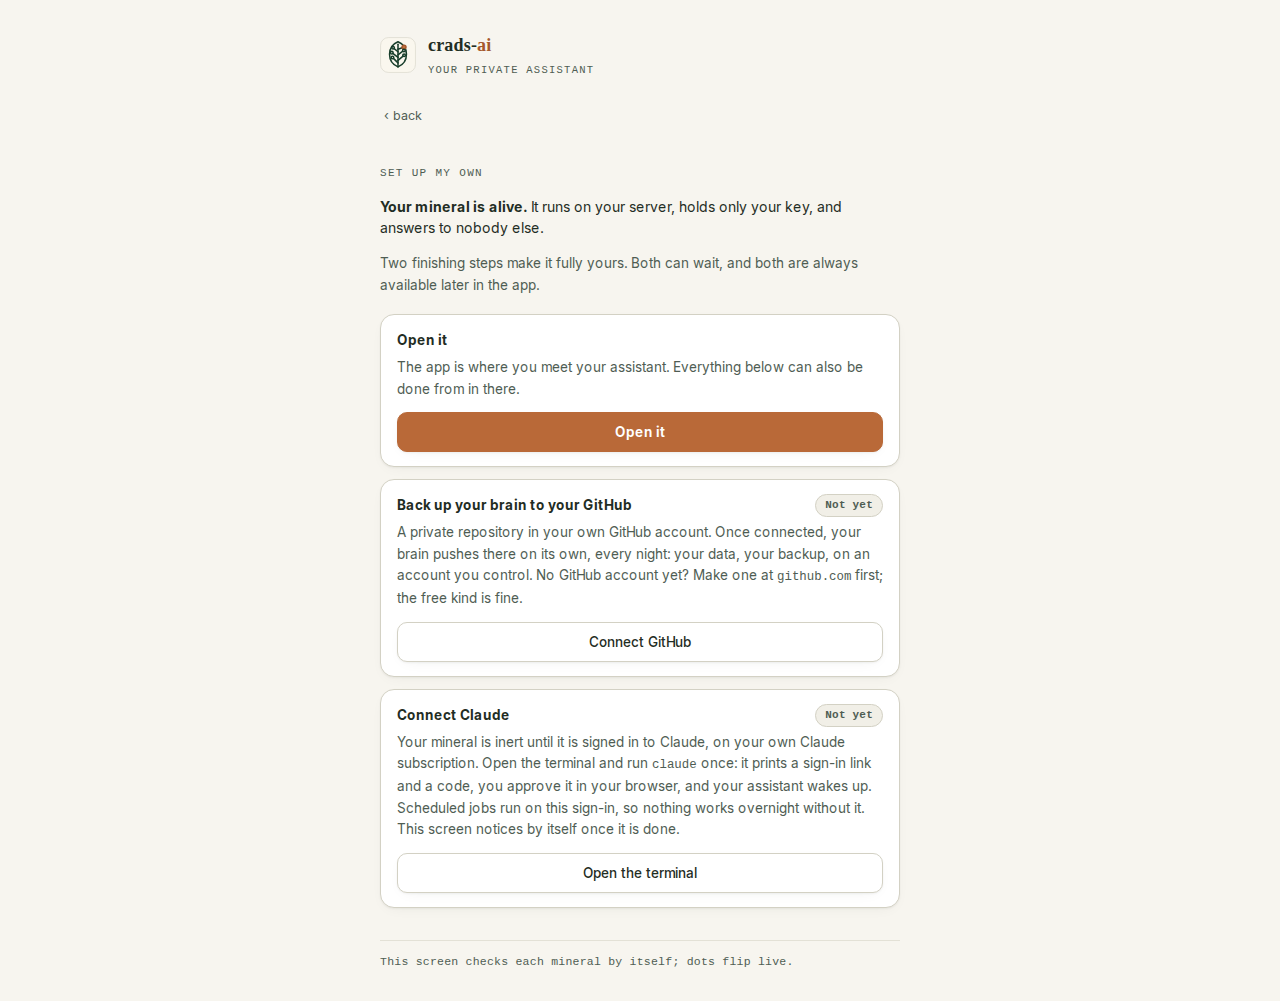 123
123- Open it: the app, where you meet your assistant. Never wrong to press first.
- Back up your brain to your own GitHub. A code appears; you approve it on github.com.
- Connect Claude: opens the Terminal with the sign-in running. Nothing works overnight without it.
- Back up your brain to your GitHub runs right there: press Connect GitHub, a code appears, and you approve it on the github.com page it names. The wizard makes a private repository in your own account and your brain pushes there nightly from then on. Back up and restore is the full picture.
- Connect Claude opens the app's Terminal tab with the sign-in already running; that is step 7 below, and the checklist notices by itself once it is done.
Both can wait, and both stay available in the app later (the Backup card on Your pebble, and the Terminal tab), so pressing Open it first is never wrong.
Step 6. Look around, briefly#
The app looks sparse right now because your mineral knows nothing yet. Worth thirty seconds: the left-hand sidebar is how you get everywhere, and the rest of these docs assume its names.
- Overview is home: what your assistant knows and how it is doing. The Health card here is also where the jobs your mineral runs by itself report in.
- Your pebble is this mineral itself: its name, its backup, the computers that can open it, and your own pages.
- Your assistant opens onto Brain (everything your assistant knows), Skills (what it can do, and when it runs) and Connections (what it can reach).
- Privacy & access opens onto Secrets: every password, token and key your mineral holds, and what each is for.
- Terminal sits on its own at the bottom. That is where you talk to your assistant directly. "Terminal" just means a plain text window: you type, it answers.
One habit to take with you: every page header carries a small ? button, and its tooltip is that page's own explanation of itself. When a page is new, the ? is the fastest answer.
Step 7. Wake your assistant#
Your mineral is inert until you sign Claude in on it. Claude is the AI your assistant runs on, and it runs on your Claude account, on your machine.
If you pressed Connect Claude on the setup screen's finish checklist, you are already here with the sign-in running: skip to point 3.
- On the Overview, press the big Meet your assistant button. (The same place is always reachable later as Terminal at the bottom of the sidebar.)
- If the dark window sits empty, press Open terminal.
- The first time, it asks you to sign in to Claude: a line appears with a web link and a code. Follow it, sign in to your Claude account in the browser, and approve the code.
- Come back to the app. The window is now a conversation.
You should see: your assistant greeting you in the terminal window.
This is worth doing even if you stop right after: nothing else on your mineral works until this step is done. Scheduled jobs, briefs, everything that runs while you sleep runs on this sign-in.
One honest note: signing in here signs in your mineral. If you also use the Claude or Claude Code apps on your laptop, those are separate sign-ins on a separate machine. Step 8 uses the Claude Code app; that sign-in is yours, on your laptop, and this one is your mineral's own. Until this sign-in lands, the switches on the Skills page refuse to flip and Run now stays disabled. That is deliberate, not a fault: a switch that turns green on a signed-out mineral is a lie, promising a schedule the mineral cannot keep.
Step 8. Do the interview#
The last and longest step. Your assistant interviews you, and out of that interview it builds your brain: who you are, what you are trying to do, who is in your world, how you work, what to never touch.
Open Claude Code on your laptop and connect it to your mineral: the app's Help page shows the connection name and the three clicks (the Environment dropdown, Add SSH connection, paste the name; then pick the folder called state). For a folder on this computer, it is Open folder. Say "introduce yourself", and you should see your assistant greeting you, in Claude Code. Then type:
/onboardand press Enter.
This is where you will talk to it from now on. The app is for looking at what it knows, switching schedules on, and connecting services; Claude Code is where the work happens.
It runs as a conversation, one question at a time, and its first question is what you want to call your assistant. It is resumable: leave whenever you like and it picks up where it stopped, even days later. Nobody answers all of it in one sitting, and it is designed for you not to.
The interview has its own page: what the eight layers of questions are really asking, how the pause-and-resume works, and what happens to your answers at the end.
Step 9. Two switches worth flipping today#
Your assistant is awake. Before anything else, try one run by hand: open a skill on the Skills page and press Run now. It works in the background on your mineral, and the result lands in your brain. One real run teaches you more about what you just set up than any page of these docs.
Then, two more small things turn it from something you visit into something that works for you:
- Give it a schedule. Open Your assistant, then Skills, switch on one skill (inbox triage is the usual first), and press Save schedules. That is the difference between a tool you remember to use and a sorted inbox that was done before you woke up.
- Connect Telegram, so your assistant can reach your phone. Briefs land there, and anything that needs your yes asks you there. It takes about two minutes and has its own step-by-step page.
The schedule editor is worth a moment. Switching a skill on opens its drawer, because the editor is the reason you switched. A schedule comes in three kinds: on days at times (day chips, where leaving them all blank means every day, and you can add more than one time); every few hours, in 30-minute steps, with a pause-overnight option; or every few days at a time you pick. Each skill also carries a "Send me the result" checkbox, which needs Telegram connected to land anywhere. The Save schedules button sits under the list once your skills have loaded, and nothing is written to the mineral until you press it.
Where you land#
That is the whole setup. From here, each new habit is one page:
- Your first week, for what to actually do with it over the next seven days.
- What a mineral is, if you have not yet worked out what the words mean or why it is shaped this way.
- Connect Google, with your own key, because most of what makes an assistant useful is what it can reach.
- Back up your mineral, and get it back, which has one step only you can do.
- Add another computer, when you want your other machine in too.